Peer-to-peer · Mac
A direct Wi-Fi connection between the iPhone and Mac. Enable peer-to-peer in both the app and server.
Connection setup →LET’S GET YOU CONNECTED
Tell us what’s happening. We’ll walk through the right checks for your setup.
Choose a topic below. Enable JavaScript for guided, platform-specific steps.
If this worked before, note any recent app, operating-system, router, or security-software change. Include that in your support message.
On your iPhone or iPad, open Settings → Privacy & Security → Local Network and enable Mobile Mouse. Reopen the app and try connecting.
On Macs that show a Local Network section under System Settings → Privacy & Security, also allow Mobile Mouse Server. If the app is not listed, open it and try discovering your computer to trigger its permission request.
Connect both devices to the same trusted network. The computer name in Mobile Mouse is not the Wi-Fi name. An Ethernet-connected computer can work too, if its cable connects to the same local network as the phone’s Wi-Fi.
Matching names are a first check, not a guarantee: guest, hotel, school, and work networks may prevent devices from communicating.
On hotel, school, work, or guest Wi-Fi, device isolation may block local control. Ask the network administrator whether devices can communicate, or choose another connection method below.
Windows: In Settings → Network & internet, open the connected Wi-Fi network’s properties (or Ethernet). Use the Private network profile only for a network you trust, such as your home network. Leave public networks Public. Changing this setting cannot remove restrictions imposed by a router.
If you use a VPN, check whether it allows access to local-network devices. On a device you manage, briefly disconnect the VPN and retry. Reconnect it after the test. If that fixes the problem, enable its local-network-access option or ask its provider for help.
Work-managed devices may require your administrator’s help. Do not change organization-managed security settings.
Only run this test on a trusted private network. Keep this page open so you can turn protection back on immediately afterward.
If you cannot perform this test, skip it. Do not disable antivirus protection or your router’s firewall.
Leave the firewall on for this step.
Retry with protection enabled. If it still fails, record the security product’s name for support. Do not leave the firewall off as a workaround.
Use the address of the active Wi-Fi or Ethernet connection—not a VPN adapter or an internet “what is my IP” website.
ipconfig, and find the active Wi-Fi or Ethernet adapter.192.168.1.20 and 192.168.1.35 match; 192.168.2.35 does not. The full addresses must be different.Other subnet masks need a different comparison—send the addresses and masks to support or ask your network administrator. Do not manually change addresses just to make them match. Even matching subnets can have device-isolation restrictions.
Open Mobile Mouse Server settings on the computer. In the mobile app’s server connection settings, enter the IP address and port shown by the server. If the computer has multiple addresses, use its active local Wi-Fi or Ethernet address.
If this works, the problem is automatic discovery. On Windows, check that Bonjour is installed and running if included by your server installer. Security software must allow discovery as well as the server connection.
A saved manual address can become outdated after a network change. Clear both IP and port fields so they show Auto to return to discovery. Manual entry cannot bypass network isolation. Never forward router ports as part of this local-network check.
A direct Wi-Fi connection between the iPhone and Mac. Enable peer-to-peer in both the app and server.
Connection setup →Connect over the internet with an active Cloud subscription. Both devices need internet access, and the computer must stay awake with the server running. Network policies may still restrict access.
Cloud setup →A separate app with its own setup and device requirements. Check compatibility before choosing it.
Visit the Bluetooth website →Peer-to-peer is for a Mac. Keep Wi-Fi enabled on both devices and bring the phone near the Mac. Enable peer-to-peer in the mobile app’s server settings and in Mobile Mouse Server settings on the Mac, then reconnect.
If you return to normal local-network use, disable peer-to-peer in both places. Mismatched settings can affect connection and performance.
An Apple account used for an App Store purchase is not the same thing as signing in to your Mobile Mouse account. Cloud cannot reach a computer that is asleep or offline.
If permitted, try the phone on cellular data or a different trusted internet connection. Review whether VPN or security software blocks Mobile Mouse Server’s internet access. On managed networks, ask the administrator.
If changing networks resolves it, tell support which connection fails and what security software is installed. Do not open router ports or disable protection permanently.
For a local server password prompt, open Mobile Mouse Server settings on the computer and review or change the connection password. Reconnect using that password.
This is separate from your Mobile Mouse Cloud account password. Do not send either password to support. If the message is a Cloud sign-in error, use the account-help path instead.
Keep Mobile Mouse open in the foreground, leave the phone unlocked, and keep the computer awake for a short test. Does it stay connected now?
If so, note whether phone lock, switching apps, computer sleep, or changing networks triggers the problem. Reopen the app and reselect the computer after waking it. The server must be running after restart or sign-in.
If the problem happens during active use too, continue with connection-quality checks. Include the trigger and whether reconnecting helps in your support summary.
Move closer to the Wi-Fi router (or the Mac for peer-to-peer). If practical, connect the computer to the same router by Ethernet and test again. Pause large downloads for the test.
For Cloud, compare with a local connection when both devices are on the same network. Internet speed alone does not guarantee responsive control.
For ordinary local-network use on a Mac, turn peer-to-peer off in both the app and server. Then reconnect and compare.
Open Mobile Mouse Server settings. Under Touch Motion, adjust Pointer Speed and Acceleration a little at a time. Under Air Motion, adjust the X/Y speed and acceleration for motion control. Scrolling has separate X/Y settings.
If movement responds immediately but travels too far or too little, these settings are the right place to start. If movement arrives late or pauses, choose the delay/jerky-movement path instead.
See server settings →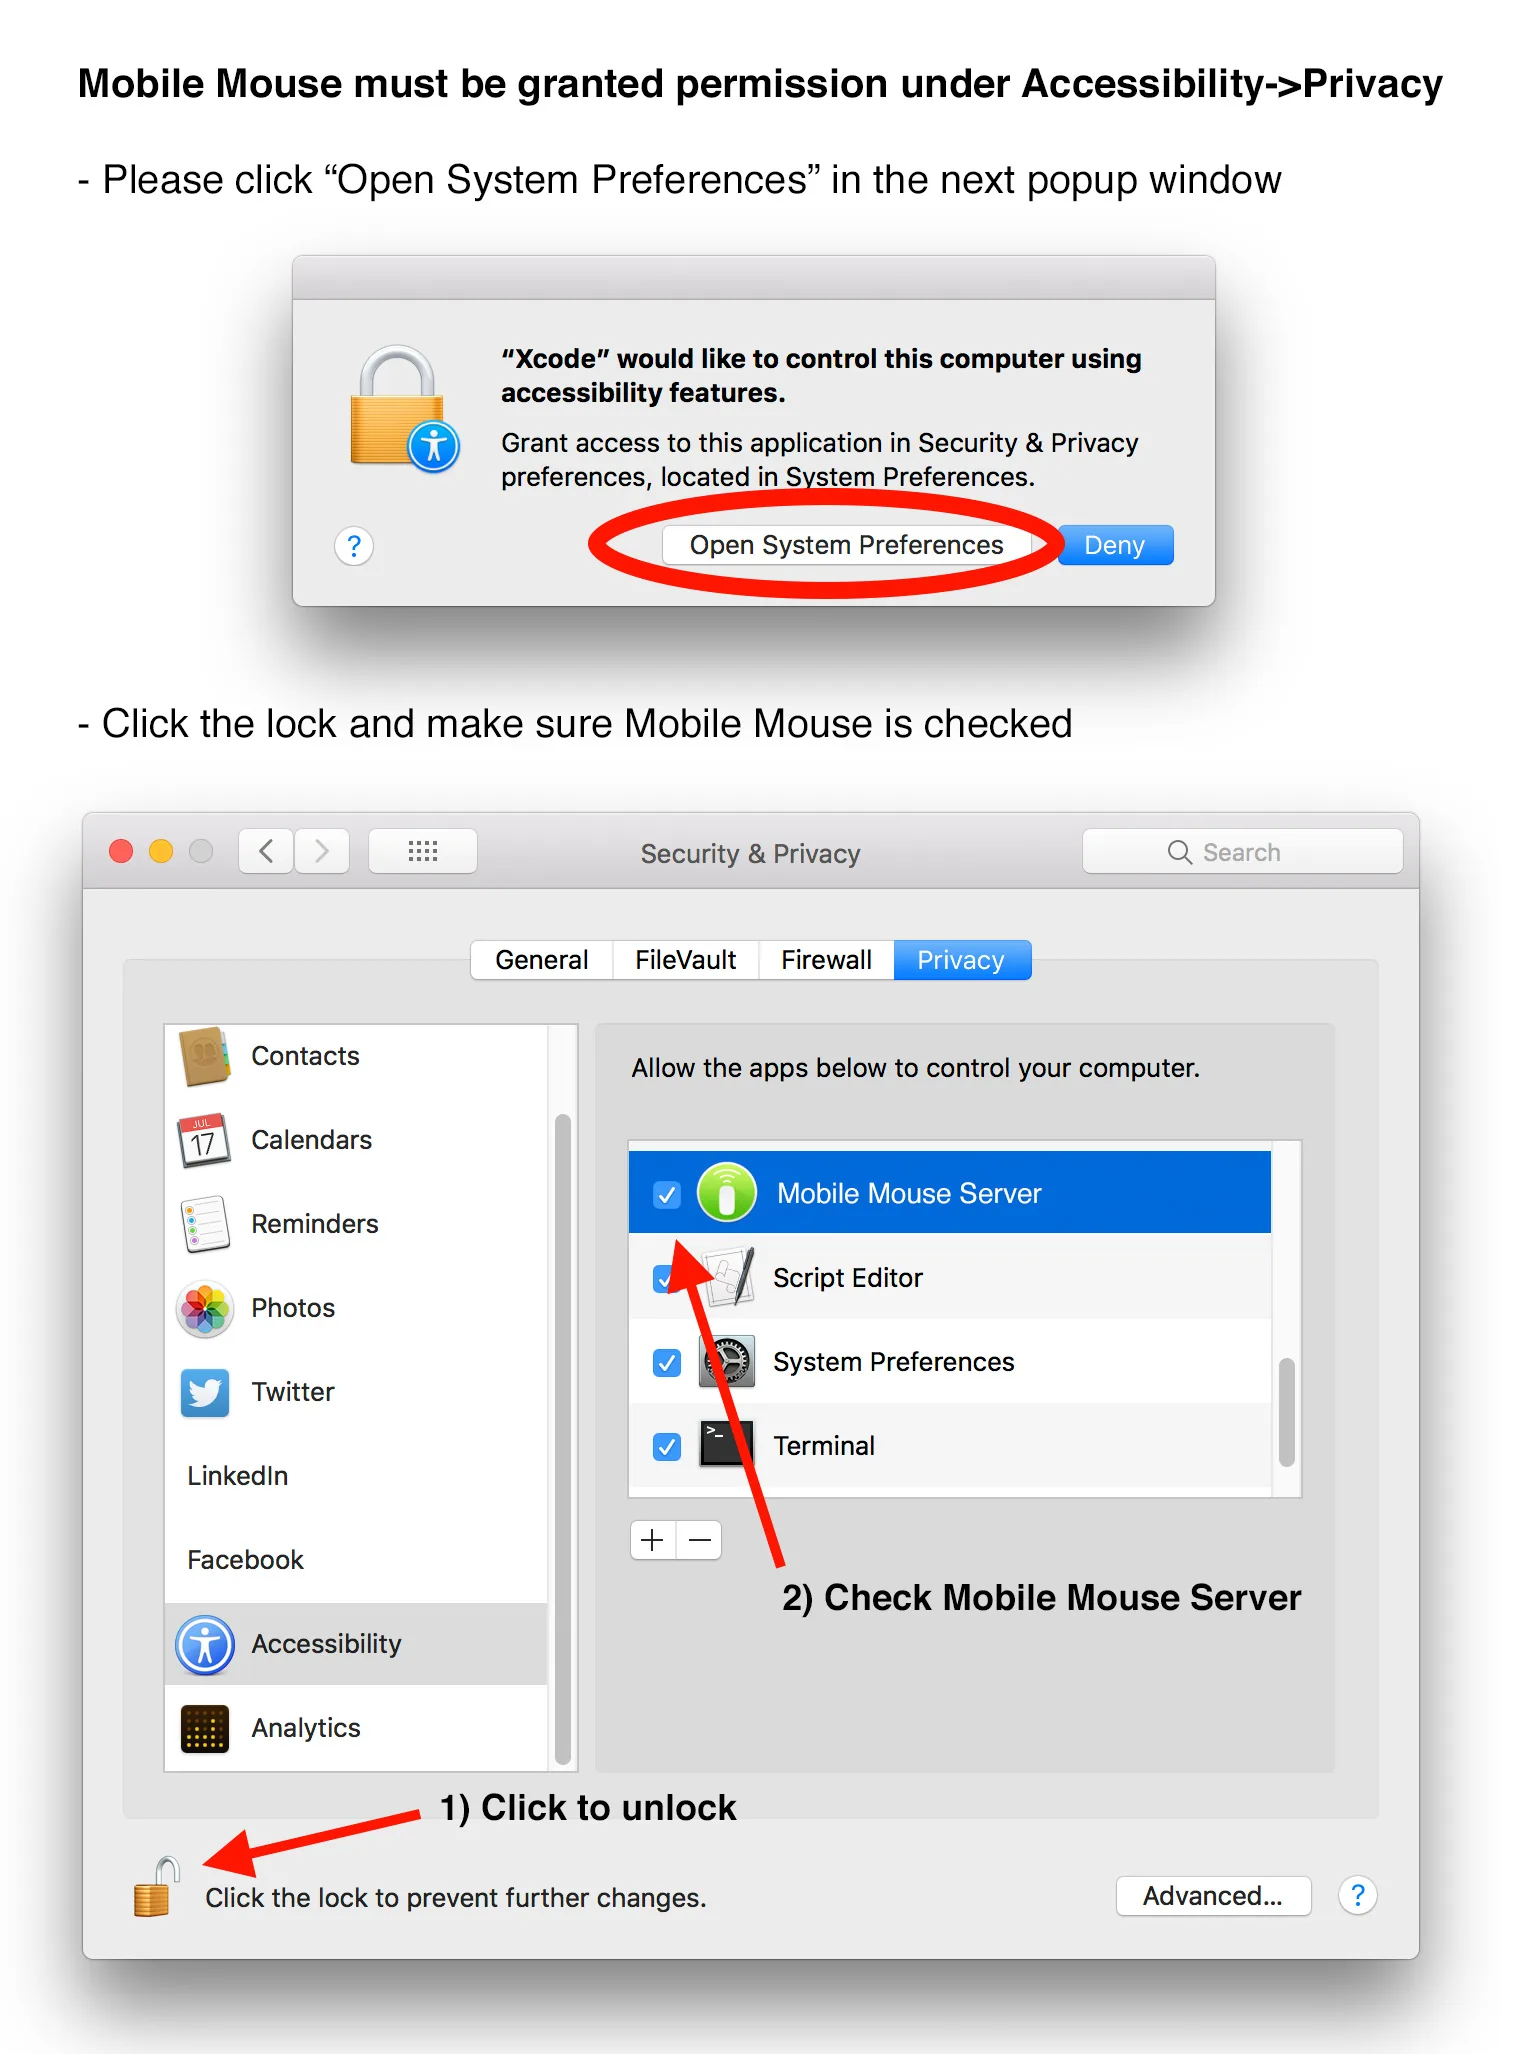
The appearance varies by macOS version.
If permission is already enabled but an update changed the behavior, turn it off and on again, then relaunch the server. Tell support if macOS will not retain the permission.
Open Windows Security → Protection history and look for an action involving Mobile Mouse or a component installed with its server. Check your third-party antivirus history too, if applicable.
A blocked helper can affect input even while the connection works. Record the detection name and affected file path. Do not assume every detection is a false positive or restore an unfamiliar file. Contact support to confirm a Mobile Mouse component before allowing it.
If installation was incomplete or a helper was removed, download the current server installer from our official downloads and run its setup again. Restart if the installer requests it. If input still fails, send support the installer version and detection details so we can check the helper services.
Try moving, clicking, and typing into a blank document in TextEdit on Mac or Notepad on Windows.
If that works, record the application or screen where input fails. Windows sign-in, administrator prompts, games, and elevated applications may need different input support. Do not disable User Account Control to fix this.
For login or administrator-screen problems, contact support for the helper configuration appropriate to your Windows server version. Include whether control works normally on the desktop.
Test movement, a single click, a drag, and scrolling separately. Review the app’s gesture settings and the server’s scrolling speed. Try an explicit mouse button as well as tapping the trackpad.
Use our iPhone & iPad controls guide to confirm the gesture for your version. If one gesture fails consistently while the equivalent button works, include that distinction in your support message.
Tap a text field on the computer, then type a short test in TextEdit or Notepad. Check which keyboard language/input source is selected on the computer and which keyboard is active on the phone.
Compare ordinary letters with the specific characters, language composition, or shortcut that fails. For shortcuts, note the modifier used: Command on Mac versus Control on Windows.
Tell support what you typed, what appeared, and both keyboard languages. Use a harmless example, never a password. If you only need help showing the keyboard, see the controls guide.
Bring the application you want to control to the front on the computer. Application-aware controls depend on a supported application being active and correctly configured.
Review Program setup. On Mac, if a prompt requests permission to control another application, review it under System Settings → Privacy & Security → Automation and allow the relevant Mobile Mouse integration.
If basic mouse and keyboard work but a media button does not, include the target application, its version, and the failing button in your support message.
Use the same Mobile Mouse account in the app and server. Check the email address on both devices. If you have forgotten the password, use the password-recovery option on the sign-in screen, if available, or contact support.
Record the exact error. Never send your password, verification code, or recovery link. The local server connection password is a separate setting.
Confirm which app and feature you purchased. Mobile Mouse, its separate Bluetooth/USB apps, and Cloud access have different requirements; a purchase in one does not automatically establish access in another.
For an App Store purchase, confirm the device uses the Apple account that made it. Check the purchase/subscription in your Apple account and use Restore Purchases if that option appears in the relevant app’s purchase screen.
If an active purchase is still not recognized, contact support with the app name, feature, purchase date, and any error. Do not buy it again just to troubleshoot.
On iPhone or iPad, open Settings → your name → Subscriptions, select the relevant subscription, and review its status or cancellation options.
If it is not listed, check which Apple account made the purchase and who billed you. For Apple-billed refund requests, visit Apple’s Report a Problem. For other billing or unclear charges, contact support with the product and billing provider—never full payment-card details.